The purpose of this tutorial is to show you how to install a DIY solar power kit for your IP security camera in remote locations and areas where no power is available.
How to Send Data from a Solar Powered Camera?
– Do It Yourself Guide –
There are two primary methods for sending data from a Solar Powered IP Camera to an Access Point:
A Point to Point Network (Ubiquiti) and a Cellular Gateway (Cradlepoint). Both allow you to view stored and live footage remotely.
You can also use a Solar Powered IP Camera with Local Storage SD cards for video surveillance footage storage.
Setting up a solar powered surveillance system from scratch can be very involved. So eliminate the guess-work with the Vorp Energy Remote Solar Kit for Security Cameras.
Determine The Power Draw Requirements from Camera’s/Gateways/Lighting Equipment Being Used
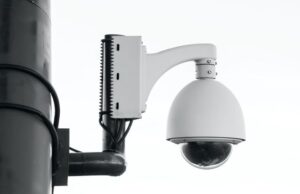
Step one in creating a solar IP Camera Kit would be to identify the Power Requirements of your surveillance and communication equipment. That means you would add up the nominal wattage of all cameras, wireless routers, point to point, radios, lighting, speakers that will be placed on the pole and powered.
Step two is to identify the total power draw of the equipment in Watts. You can find out how much nominal wattage your equipment pulls on the cameras Spec Sheet.
Choose Your Battery Type Depending on Your Application and Budget
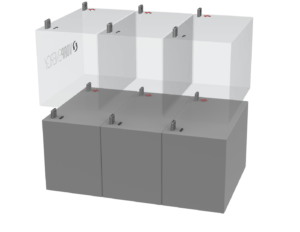
Your Battery is the heart of your solar powered IP Camera system and provides consistent power day and night despite weather conditions. The Solar Panels provide power to keep the Battery charged on a all the time on daily basis.
The most common type of battery you will use for your Solar Powered IP Camera is a Deep Cycle AGM Sealed Lead Acid Battery (SLA). It’s the most cost effective and common solution for powering network IP cameras and wireless networks in off grid locations.
However, various other battery technologies are available including Lithium Iron Phosphate (LiFePo4). This type of battery lasts longer and is smaller but is significantly more expensive. Click here to learn about the differences between SLA and LiFePo4 batteries.
Discover What Solar Cameras and Cellular Gateways Your Gear is Powered Through
Camera spec sheets also tell you whether the equipment runs on 12 Volt DC, 24 Volt DC, or Power over Ethernet (PoE). These are all things you’ll need to know to successfully power a camera via solar. Read through the camera fact sheet to determine how much power the camera draws and needs to always operate. Then add up the nominal wattage used of each piece of equipment and come up with total watts used.
If your surveillance equipment operates on 12 VDC you would use a 12V Battery. If your equipment operates on 24 VDC you would use a 24V Battery. You can also create a 24 Volt Battery Array by using two 12 Volt Batteries Wired in Series. If your equipment operates on PoE most PoE Injectors convert both 12V and 24V DC to the appropriate PoE output.
How to Correctly Size Your Battery Array for 24x7x365 Power to IP Cameras and Cellular Gateways
You will want to size your Battery Array for your solar IP Camera Kit so as to only operate on the top 50% of its cycle. This will help extend the lifespan of the batteries. Again, you will want to refer to the equipment manufacturer’s Spec Sheet to see how many Amps your equipment draws.
IP Security Camera Power Needed Example: If your IP Camera draws a total of 6 Watts and operates on 12 VDC, it will draw 0.5 Amps (500 mA). If your Wireless Antenna draws 8 Watts and operates on 12 VDC it will draw .67 Amps (670 mA). You can determine this by using the formula Volts x Amps = Watts or in this example Watts ÷ Volts = Amps.
If your goal is to power your solar IP Camera equipment with a 50 Amp hour Battery you would perform the following calculations:
50 ÷ 2 = 25: Dividing the Amp hours by 2 ensures that you are operating on the top 50% of the Battery’s cycle, giving you 25 Amp hours available to use.
.5 + .67 = 1.17: This is the combined amperage of your two pieces of equipment.
25 ÷ 1.17 = 21.37: Dividing the available Amp hours by the total Amperage of the equipment tells you how many hours your Battery will be able to provide that output.
In this example a 50 Amp hour Battery will power your solar IP Camera equipment for 21.37 hours before becoming over-discharged. This scenario works because an appropriately sized Solar Panel will be recharging the battery daily.
A smart battery and power monitoring & control system, will send you alerts when battery levels get too low, avoiding expensive battery damage.
How to Correctly Size the Solar Array You’ll Need to Power Your Surveillance and Communication Equipment
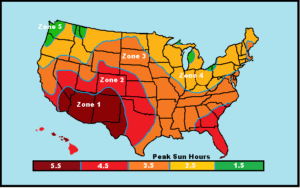
Once you have identified the quantities Power Requirements of your IP Cameras and any communication equipment you need, and the appropriate Battery sizes, you can turn your attention to sizing the Solar Panel Array which is the solar power supply for security cameras.
You need to draw enough power from the sun in your location to power your equipment. The sunnier your state, the more power you’ll be able to draw. You will need to identify the average Peak Sun Hours your area receives. This information can be found using Vorp Energy’s Solar Zone Radiation Map shown above. For a more detailed explanation of this step click here.
Determine Voltage Output And Solar Calculations
To adequately charge your Battery Array you would use a Solar Panel with equal or greater Voltage output. If you have created a 24V Battery Array by wiring two 12V Batteries in Series you would need a 24V Solar Panel. Another option is to use two 12V Solar Panels wired in Series.
If your goal was to charge the same 50 Amp hour Battery mentioned above you would need to replace around 20 hours of Battery Life in the few short Peak Sun Hours your area receives. In December Zone 1 only receives an average of 2.93 Peak Sun Hours. This would be the number to use for your calculations unless you want to resize your solar IP Camera system at the change of each season.
This means that for 2.93 hours your Solar Array will be producing close to its Max Power Voltage (Vpm) at close to its Max Power Current (Imp). A 12V, 100 Watt Solar Panel will send 13.8 Volts into your Battery at 5.75 Amps (Imp) and will replace 16.85 hours of Battery Life. (5.75 Amps x 2.93 Peak Sun Hours).
This is adequate considering that the sun will only be down for 12 to 14 hours, and your Solar Panel will be producing some amount of electricity during Non-Peak Sun Hours. If you wanted to provide Solar Power for your IP Camera, but lived in Zone 4 which, in December only receives 1.4 Peak Sun Hours you would need a larger system.
Add Solar Charge Controller to Monitor Your Surveillance System’s Power Usage
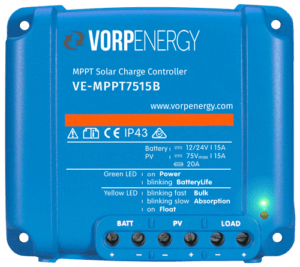
If your Battery is the heart of your solar IP Camera system, the Solar Charge Controller is the brains, and ensures that your Battery is not over-charged or over dis-charged.
To select the proper Charge Controller you will use the voltage of your solar IP Camera system, as well as the Short Circuit Current (Isc) of your Solar Panel. A 100 Watt Solar Panel will have an ISC of around 6.3 Amps. You would need a Solar Charge Controller that can handle the max current of 6.3 Amps. A 12 Volt, 10 Amp Solar Charge Controller would be appropriate for the above example.
There are two primary types of solar charge controller; Pulse Width Modulation (PWM) and Max Power Point Tracking (MPPT). Learn about the differences here.
Secure Your Equipment with Weatherproof Enclosure and Mount to Pole
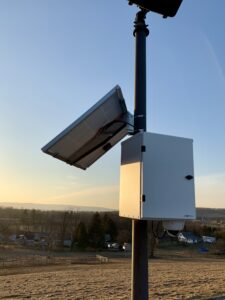
Finally, you will want to find a weather proof enclosure to house your equipment such as Solar Charge Controller and batteries. This is a safe spot that can withstand the outside elements. Vorp Energy’s custom built enclosures are made for this specific purpose and come standard with our Solar power kits for security camera surveillance. Our enclosures are NEMA 4x for safely powering surveillance equipment in the elements.
Final Thoughts On Solar Power Kits for Security Camera Surveillance
In almost every surveillance situation, having anything less than 100% up-time is unacceptable. Each element we have mentioned needs to be carefully considered when designing a solar surveillance system. Here at Vorp Energy we manufacture solar powered systems for IP cameras in bulk, which means that not only have we ironed out all the kinks in the road, but we offer a well polished solution at a lower price than can be patched together for a “one-off” job with problem after problem. Let us make your next outdoor surveillance system install EASY!
Let our Expert Team Power Your Next Outdoor Solar Surveillance Installation!
Call us at (208) 904-0424

Leave a Reply